Monday, 28 February 2011

Gently does it...

“Remember to be gentle with yourself and others. We are all children of chance and none can say why some fields will blossom while others lay brown beneath the August sun. Care for those around you. Look past your differences. Their dreams are no less than yours, their choices no more easily made. And give, give in any way you can, of whatever you posses. To give is to love. To withhold is to wither. Care less for your harvest than for how it is shared and your life will have meaning and your heart will have peace.” ~Kent Nerburn


The spotlight over at Crafty Cardmakers this week is silhouettes and our sponsor is Stitchy Stamps.  I adored this digi stamp from the moment I saw it and I had all sorts of ideas bouncing around my head about what I was going to do with it, but I wasn't sure whether any of them would work! lol

I decided to be a little adventurous and see if one of my ideas would work.  I had been wondering for a while if Cosmic Shimmer Mists would work on a glossy photo paper so I set about with a few sprays, got my hands into their usual inky mess and crossed my fingers that it would work.  With the careful application of a piece of cling film to spread the ink around a little, and then an even more gentle removal of said cling film, I was then scared to touch the paper incase I smeared it, but I was brave and gently carried it to my workstation using the sheet of baking parchment I used to spray on and set about it with my heatgun on a low setting and very gentle strokes across it to stop it from warping.  I have used gentle a lot there, but I found that being gentle was the key to doing this successfully!  I was worried I was going to end up with a slidey messy piece of paper to add to my messy hands, but it worked.

My printer decided it was in a good mood as well and when I set it to 5x7 glossy, it printed it perfectly!  I was in shock!  Random ideas I have rarely come off well for me especially where my finickety printer is concerned lol  You should see some of the disasters I have had in the past with it, especially when I have been trying to get it to print on vellum - you would think I had asked it to print on toilet paper the amount of times it has refused to feed the paper through properly!

I trimmed the image to a square then backed it onto a slightly larger square of black paper and added some matching diecut corners.  I would swear that die hates me as sometimes it cuts perfectly and other times it half cuts the pieces and I have to finish it off carefully with my craft knife.  This was one of those times grrrrr.  But still, the effort was worth the end result!  The diecuts frame off the image nicely.  I decided to leave the card as it was as I didn't want to detract from the main image.

Sunday, 27 February 2011

Grinning like a Cheshire Cat

The stamp I have used for this card is Sweet Pea Ching-chou Kuik's Cheshire Cat Illusion.  I must admit, I have had this stamp sitting in my collection for ages and have never used it as, to be honest, the cat scared me!  No, I don't mean I was frightened of it, more that I was scared of colouring it.  The original artwork shows the cat as wispy and almost not there, as indeed the Cheshire Cat is portrayed in the book, afterall he is just a grin at some points, and I was worried how to go about colouring him so that he was neither here nor there.  I opted for grey promarkers and a touch of clear star gelly roll pen in the end to try and create an illusion of being partly invisible.  I only used cool grey 1 and 2 for the head and a touch of pastel green for the eyes.


For Alice herself, I used powder blue and sky blue and really blended them into each other at one side to add depth.  Her skin is coloured with satin and sunkissed pink and her hair a combination of buttercup and canary with accents of gold gelly roll pen.  The toadstools are coloured again with sunkissed pink, pink carnation and ruby, with the stalks being cooly greys 1 & 2.  The background is denim blue and powder blue blended into each other to give a misty effect.


I cut the imaged out using a nestie and then stuck it to some silvery paper and trimmed it to follow the lines of the nestie diecut as I didn't have one larger.  The background papers I created myself using starburst stains on one side which is embossed, then overembossed with moonglow powders to emphasise the patterning.  The other side is blue and pink starburst stains with sepia brown swirled about on photo paper and then stamped onto using a frondy flowery stamp plate I picked up for just 50p on the sale table in my local art shop.  I have no idea who makes it but it's fab don't you think?  The 'seam' between the 2 backgrounds is covered with a piece of shimmery lilac ribbon and then I added a few tiny gems for a bit of bling.  I decided to make this into an easel card and used a long border stamp again a 50p bargain on a scrap of the photo paper and an Alice in Wonderland quote printed on vellum to create the stop.

I would like to enter this for the following challenges:
 
Quirky Craft Challenges - Alice in Wonderland
Sparkles Forum Challenge - Pink, Brown. Blue

Saturday, 19 February 2011

Design Team Call at Sweet Pea

How excited was I to find out that Sweet Pea Stamps Challenge Blog were having a Design Team Call?

Any regular viewer of my blog will know I absolutely love their stamps and get even more excited when I am expecting a new delivery.  I find their stamps stamp up really well and the ones I have have lots of lovely skin areas and I just adore how nicely they colour.  I have a bit of a soft spot for Ching Chou Kuik's range which they sell but got my mitts on a couple of Jennifer Nilsson's designs with my last delivery.  So cute!

Whilst I am still a relatively newbie cardmaker, I cut my stamp colouring teeth using Sweet Pea Stamps and as such have developed a great fondness for them.  I would love the opportunity to be on the Sweet Pea Design Team as it would give me even more excuses to use their stamps and hopefully pick up on some more ideas from their ultra-talented existing DT!  I'll try anything once!  They have asked to see at least 2 different examples of my work but I hope to be able to show a few more than that!  A couple of the cards I have done have been featured on their blog, so I hope the links below show what I am truly capable of:

***Please hover over the Artist and Stamp Names for links to the projects xx***

This is the latest card I have done using a Sweet Pea stamp.  It's using Ching Chou Kuik's Radiant Butterfly stamp and it is such a lovely stamp to use.  I have a feeling this one is going to become a favourite of mine!


This one is Jennifer Nilsson's Daisy Flower Fairy.  It's the first stamp I have done using one of her designs and it's not the only one I own.  I also have My Sister and Me, for which I am just waiting for the perfect opportunity to give it it's debut airing.


Which brings us onto one of my favourite stamps - Ching Chou Kuik's Blue Eyed Fairy  This is one of the most versatile stamps I have come across as it can be coloured in so many different ways.  I have previously done her with brown hair but for the challenge this card was Icy colours, and Lil Miss Blue Eyes was the perfect stamp to use.  If you look at the photograph she looks positively hypothermic! lol


One of my other favourite stamps for it's versatility is Ching Chou Kuik's Masked Fairy in Green, but I have to say I don't think I have ever coloured her in green!  She worked wonderfully well in autumnal colours and this card won me a challenge prize.  I created all the backgrounds myself too. :-)


For this project, I had wanted to do something a little different, so I set about finding out how to make a trinket box and found a tutorial that someone had done for one on one of the blogs.  I had already stamped and coloured Ching Chou Kuik's Faraway Moon and created card to match.


The stamp I used for this easel card is Elaine Cox's Little River Mermaid.  I decided to have a break from my beloved Promarkers and have a dabble at painting with some Twinkling H20 paints.  Managed to get quite a wide colour range out of them which wasn't bad seeing as I only had 6 to choose from!


And finally to the first Sweet Pea stamp I ever used, Ching Chou Kuik's It's My Birthday. Here I have made a bottle hanger to match a birthday card for a 40th birthday.  I think I fell in love with their stamps from this moment.  Seems strange to put it last in the list, but I wanted to put my most recent first as I hope my skills have improved since this one!

Havana wonderful time

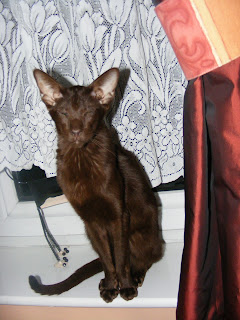
Firstly I must apologise for the awful pun in the title of this entry but we got a new family member at the weekend.  He's a havana cat called Mojito, or Momo for short.  He's the most wonderful chocolate brown colour and the most over-affectionate cat I have ever met!  He really does not take no for an answer and I have already had to give him three cuddles since I sat down to start writing this blog.  He is a rescue cat who had been rescued from the home of a lady who had been neglecting him and others due to mental issues and when he was found he was practically skeletal.  Bringing him back to health slowly but surely and he certainly does like his food and he eats like he doesn't know where his next meal is coming from, which given his background is understandable but doesn't make him any less 'in-your-face' when trying to eat something yourself in peace!  Combined with his general chocolatey goodness and my love of the genuine chocolate article, is it any wonder that my mind has been on all things brown this week?


My delivery of Sweet Pea stamps arrived earlier this week and one of those was Ching Chou Kuik's Radiant Butterfly which is actually quite a large stamp by their usual standards.  I loved this one when I saw it as it was a little different and couldn't wait to have a go at colouring it.  I coloured the image using my promarkers in cinnamon and tan for the dress and hair, honeycomb and peach for the butterflies and jewellery, sunkissed pink and satin for the skin, pear green for the headdress and pastel beige for the fan in the background.  I added a touch of bronzey gold metallic gelly roll to the jewellery to give it some bling.


Just to show the promarkers I used.

For the design papers I have used a Colorbok set which a friend bought me in the states.  I used 2 different pieces to form the 2 halves of the background and an additional piece which I backed onto plain brown.  I cut the stamped image out with a circle nestie and then using my scalloped circle, cut a piece of plain brown which co-ordinates with the image colours.  I used a piece of ribbed brown ribbon down the centre to hide the join between the two DPs , put it all together and embellished with 3 frosted amber gems.

And not forgetting my colour inspiration this week... ladies and gentlemen I would like to introduce to you Mojito!

And no, he doesn't like to open his eyes for photographs - the flash sensor always makes him close them!  During the writing of this blog entry he decided to climb inside my housecoat to keep warm... lol

Pals Paper Arts - Sketch
Gingersnap Creations - Coffee and Cream
Passion for Promarkers - Coffee and Cream
In a Sweet Pea Dream - Anything this time

Wednesday, 16 February 2011

Brown and Green and Buzzy things!

I ordered some new stamps online a week or so ago and they were from Sweet Pea in the US as they had a fab sale on and I decided to treat myself to some new ones.  I was so excited when I sent off the order and even more excited when I got an email telling me they had been despatched!  Only took less than a week to arrive too which is amazing considering the distance they have travelled.  Took less time than ordering from this country!  Had to work last night but I couldn't wait to get home and have a play with them and luckily it was a quiet night so I got to knock-off early and head home.  I had spent an hour or so carefully trimming the stamps to size as they were unmounted when they arrived and marvelled at just how sticky the sticky side of foam mounting sheets really is when I had random pieces stuck to my hands a clothes....


The stamp I have used for this card is Jennifer Nilsson's Daisy Flower Fairy.  It's so cute!  I also have another of her designs which I am waiting for the right project to use.  Really sweet stamps and this one is really getting me in the mood for spring.  I coloured the stamped image with promarkers, mainly using tan and cinnamon for the fairy with almond and dusky pink for the skin, a touch of pumpkin and honeycomb for the flowers and mint, leaf and lime green for the leaves.  I added a little sparkle with my gelly roll stardust pens to the hair and wings to make them shimmer and trimmed the image and matted onto a piece of orange paper and trimmed to leave a small border.  I am quite obsessed with my nesties at the moment and a few weeks ago I got a set of scalloped circles to go with my plain circles and I used the scalloped die to make the green circle and the plain circle to make the brown one.  I spotted a challenge at Mojo Mondays whilst mooching about on blogger which had a sketch to follow so I have used that to create this card.  I covered a square card with brown paper then added a square of paper from papermania's rich green pack and trimmed and stuck to the brown paper.  I placed the image on top of the scalloped circle and added 3 green gems then used a piece of pumpkin coloured ribbon behind the image with the final touch being a bumblebee charm I have been hoarding for about a year now, waiting fo the right moment to use it and here it is.  It's not glued or attached onto the ribbon in any way, simply threaded on which makes it easy to remove for a additional gift for the recipient to put on a charm bracelet.  Ok not quite Pandoro but I can't afford their charms lol

I hope it fits the following challenges too:

Crafts and Me  - anything with wings, especially fairies & angels
Bunny Zoe's Crafts  Spring - flowers Everywhere!
Paper Cutz - ladybugs, bees or butterflies
Simply Create - bold & bright
Delightful Challenges - get punchy/use punches or die cuts
One Stitch At A Time - Make it Pretty

Monday, 14 February 2011

Plastic Fantastic!

I have a whole box of acetate sheets which sits on the shelf in my craft room waiting to be used and getting very much ignored for most of the time.  I usually dust it off when I make shaker cards or need a nice surface for mixing some stains on and creating background papers or for making butterflies 'fly' off the card, but other than that I haven't really done much with it at all really.  So it was a real challenge for me to come up for something for the Crafty Cardmakers spotlight on plastic and the only plastic I had to play with was acetate (unless you include shrinkies which become more like foldy-uppies-and-mangle-in-a-messies).  I know, from a bit of research, that alcohol inks just about take on acetate, and the only alcohol based ink I have is promarkers so I decided to have a dabble.

I went to a craft fair last year where I picked up a stack of peel-offs (as a lot of newbie crafters do) and amongst those were some butterfly ones which I quite like but have hardly used simply because they were peel-offs!  But still, they were perfect for what I had in mind so I stuck one onto a sheet of acetate, coloured the reverse with promarkers and cut it out and bend it a little with my heatgun.  See I can do something with plastic lol  Luckily it didn't turn back into a caterpillar and fell into roughly the right shape.  I then used some new nesties I have to create some concentric scalloped circles with some lovely hot pink shiny mirror card (rescued from the bottom of a giftset of hairbrushes!) and then squidged some shimmer mists about on another piece of acetate and cut that out with the next size nestie, then did another bigger still in black.  Stuck it all together with a combination of glue and DST then started on the background.  I used a spare bit of my fave silver meshy background and chucked a bit of silver embossing powder about and heated it for good measure.

Here's a closeup of the centre of the card:

I would also like to enter this for the following challenges:

One Stitch At A Time - Make it Pretty
I Did It Creations - Bling it up

Monday, 7 February 2011

Let your heart guide you...

Love is not written on paper, for paper can be erased. Nor is it etched on stone, for stone can be broken. But it is inscribed on a heart and there it shall remain forever.

Valentine's Day is just around the corner so what better excuse to get the hearts out and create something filled with lurrrrrve.  The challenge over at Crafty Cardmakers this week is to use hearts.  I have had to be very secretive in the production of this card as I usually show stuff I make to my darling OH Steve, but for this challenge I am having to keep it hidden away... I hope he doesn't decide to read my blog before the big day! He will probably have guessed that I am up to something as I have been busy working away in my craft room all evening and not shown him anything yet lol  All he will know is that I have been working with something blue as parts of my hands currently match the card hehehe


The colours I have chosen this time are fairly masculine but with a bit of shimmer.  I have used cosmic shimmer mists in aqua lagoon and twilight black to create both the paper which I have dry embossed and cut the 2 paper hearts and also used it to spray paint the stamped plastiroc panel in the the centre of the card.  I then used a long card in a co-ordinating turquoise colour with a panel of silvery shimmery webby background topped onto that.  A piece of sheer black ribbon down the centre to centre the 3 hearts off and the addition of 3 ice blue heart gems to add a bit of bling.  The hearts are embosseed sizzix embosslits and I ran one heart thru with the paper upside down so that the embossing is reversed on them both and also altered the orientation of the heart.

I would like to enter this for the following challenges:

Creative Cowgirls - Love is in the air
Creative Inspirations Paint - Hearts
Crazy 4 Challenges - Valentines
I Did It Creations - Love Is In The Air
Simply Create - Give your heart away
Southern Girls - Dry Embossing